
Stomach Pain Hurts To Move
Hello, I am having a sharp pain in the left mid side of my back under the rib cage at specific point when deep breathing ...


Ask Free Question
. Standing extension how it helps – this standing extension helps reverse what you do on a daily basis (hunching)… since most bulging discs and herniated discs are caused by poor posture and repeated flexion of the spine (esp bending fwd in bad posture), this stretch helps push the disc back to neutral position. How to do it – begin this exercise by standing up with good posture. Now take both hands and place them on both sides of your lower back. Now with the help of your hands push your pelvis forward and extend your spine back. Follow the extension with your neck so that you end up facing the ceiling. – start with 10 repetitions and do 2-3 sets. – this one is particularly great to do when you need a break from sitting at your desk. ** this should not cause any pain. If you feel pain during it is not a good one for you. In that case, stop and try some of the other exercises below instead. 2. Half cobra pose (prone lumbar extension) how it helps – the half cobra stretch helps to push the disc material back towards the center of the inter-vertebral disc to allow for improved healing. The goal of repeated lower back extension is the “centralization of symptoms”, which basically means pain that travels down the affected leg to the foot should come back up closer to the low back – which will in turn alleviate the pain. How to do it – begin this exercise by lying on your stomach (prone position) and slowly prop yourself up on your elbows while keeping your hips in contact with the floor. – hold the prop-up position for 10-15 seconds before returning to the prone position (lying face down). – gradually increase to holding the end position for 30 seconds. Aim for 10 repetitions of this stretch. ** initially, you may not be able to tolerate this position very well, so make sure you start slowly and carefully. If there’s any pain, try a different exercise instead. 3. Full cobra pose (advanced extension) how it helps – this stretch is based on the same principle as the half cobra pose above. This advanced extension helps to push disc material back towards the center of the intervertebral disc, with the goal of alleviating pain symptoms. How to do it – once you’ve mastered the half cobra pose, you can increase the difficulty by moving to the advanced version of this stretch. Begin this exercise by lying on your stomach in the prone position (lying facing down) and slowly press up on your hands while keeping your pelvis in contact with the floor and lower back relaxed. – hold the prop-up position for 10 seconds. Aim for 10 repetitions of this stretch. – eventually try to hold this pose for longer if it feels good (20-30 seconds). ** if you feel pain during this exercise, it is not a good one for you. In that case, stop and try some of the other exercises instead. 4. Cat-cow how it helps – this is one of the most popular herniated disc exercises. By combining two yoga poses, the cat-cow stretch can help to relieve pressure on the herniated disc by opening the intervertebral disc space. It also improves mobility of the spine, which may help to relieve disc herniation pain and speed recovery. How to do it – begin this stretch on your hands and knees. Inhale and let your stomach “drop” towards the floor as you look up towards the ceiling. – follow this by exhaling and slowly rounding your spine while pressing into the floor with your hands and slightly curving your neck to look at your feet. – aim for 10 repetitions of this stretch and do 2-3 sets. How it helps – this exercise will help strengthen and stabilize your lower back and deep spine muscles. This will help you to maintain a good posture and avoid future episodes of herniated discs. How to do it: – begin on your hands and knees with your hands positioned under your shoulders and knees positioned under your hips. – raise your left arm and reach it forwards until it is aligned with your torso; at the same time, kick your right leg backwards until is it aligned with your torso. – hold this position for 2-3 seconds before slowly returning to the starting position. – repeat with your right arm and left leg. – alternate sides for 10 repetitions and do 2-3 sets. ** ensure that your head, neck, and back maintain a neutral alignment to minimize stress on your neck. 5.plank: how it helps – just like the bird dog, this “core” exercise will help bring your pelvis into right position by strengthening the deep spinal muscles and glutes (butt muscles). How to do it – begin lying on your stomach with your forearms against the mat. – engage your core and lift your body so that you are resting on your forearms and toes. – start with 10 second holds and work up to 30 second holds, do 2-3 sets. ** ensure to keep your back straight throughout the entire exercise – spine in neutral position. Thoracic expansion if you’re using a chair, sit facing forward and allow your upper body to fall over the back of the chair. Extend your arms above your head for a deeper stretch. Hold either position for 10 seconds. 1. Plank the world record for the longest plank is 8 hours. Luckily, you don’t need to hold it that long for the exercise to have an effect! in fact. You can hold it for 10-15 seconds. • the plank is similar to a push-up position, but instead of resting on your hands, you rest on your elbows and bring them directly underneath your chest. • after kneeling, lean forward and place your elbows on the ground directly below your shoulders. • lift your knees off of the floor and push your feet back. Ensure your back is straight and keep your neck aligned with the rest of your spine. • hold the position and tighten your core muscles for the desired time. 2. Side plank just like the original plank, but only balancing on one side. • lie on the floor on your side, facing sideways with your feet together. • lift up your body until you are supporting yourself with your elbow, directly below your shoulder. • raise your hips until your body is in a straight line and tighten your core muscles; your body should create a slant from your shoulders to your feet. • hold this position without dropping your hips. • repeat on the opposite side. 3. Pelvic tilt with exercise ball sit on a ball that allows your legs to be at a 90-degree angle with your feet flat on the floor. • keep your shoulders back and spine straight. • tilt your hips forward and flex your abdominals tight. • tilt your hips backward as you stick your tailbone out. • move back and forth slowly, keeping your shoulders back. • repeat 10 times for 3 sets. 4. Superman lie on your stomach, face down, with your arms out in front of you. • lift arms, legs, and chest off the floor simultaneously while keeping your hips grounded. • hold for a minimum of two seconds. • lower back down slowly. • repeat 10 times for 3 sets. 6. Crunches lie flat on your back, placing your feet flat on the floor with your legs bent. • fold your arms across your chest and lift your torso up until your head, neck, and torso are off the ground. • hold for a moment before lowering back down. • repeat. 6. Quadruped arm opposite leg raises • kneel on the floor, lean forward, and place your hands palm-down on the floor. • make sure your back is straight, your knees are below your hips, and that your palms are directly below your shoulders. • raise one arm as you raise the opposite leg until both are aligned straight out from your body, parallel to your spine. • slowly lower both your arm and leg until you are back in the starting position. • switch arm and leg, and repeat. 7. Dead bug lie flat on the floor on your back. • lift your arms straight up from your body, reaching through the air. • raise one leg until it is at a 90-degree angle from your body. • slowly lower until it is in the starting position. • switch legs and repeat. 8. Hip bridge lie on your back with your knees bent and raised, your feet flat on the floor, and your arms at your sides. • keep your feet hip-distance apart and try to keep your leg in vertical alignment with your knee. • flex your glutes and push through your heels to raise your hips upward. Try to make a diagonal line from your shoulders to your knees. • hold for a short moment before lowering back down. • repeat 10 times for 3 sets.

I am 23 year old female and I have a pain in my back and also a pain in my stomach (which come and go) or maybe it's in ...
Ask Free Question
Upper back pain pushups this one may seem basic, but there’s no denying that pushups are one of the best ways to strengthen the pectoral muscles. These can be done on the knees or toes. If you’re not ready for full pushups, start with your hands resting on a solid surface higher than your feet — like a very sturdy coffee table or the edge of a couch, cushions removed, that’s pressed up against a wall — and start on the toes. Having your hands higher than your feet and your body at an angle can be a good way to start a pushup regimen. As you get stronger, you can begin to lower the angle of your body. This will help you transition to full pushups more easily than going from knees to toes. A full plank engages the muscles differently, even at an angle. When doing pushups, aim for 2 sets of 10 reps per day. 1.start in plank position with your hands under your shoulders and your core engaged. 2.as you lower, inhale. 3.as you engage your muscles to push yourself up, exhale. Keep your elbows hugging in close to your body. Keep your focus on slowly breathing as you do these, and on engaging the pectorals while keeping the core tight. Don’t just crank these out to get them done — this can compromise your form and do more harm than good. If the movement is really tough, break the sets into three or five to start, or find a higher point to begin after a week of exercise. If necessary, you can even stand and do pushups pushing against a wall. Chest flyfor this exercise, you’ll need a bench or exercise ball as well as some dumbbells. If you don’t have weights, you can always use the old standby: a soup can in each hand. Just keep in mind that dumbbells are easier to hold and you can get more out of using them, as even 5-pound weights are heavier than your heaviest canned goods. 1.lie with your upper and middle back on a bench or ball, with your legs at a 90-degree angle. Hold a weight in each hand and extend your arms to the sky, elbows slightly bent. 2.as you inhale, lower your arms out wide, until your elbows are at shoulder height. 3.as you exhale, raise your hands until they meet above your chest again. 4.do 2 sets of 10. If that feels pretty easy, up it to 2 sets of 15 or increase the weight you’re using. Dumbbell row strengthening your back muscles is an important component of treating pectusexcavatum. The dumbbell row targets your lat muscles. The way it’s described below also strengthens your core, another important component of treating the condition. You’ll need some dumbbells to complete this move — err on the lighter side if you’ve never done a row before. 1.hold one dumbbell in each hand with your arms extended. Hinge at the hips until your upper body reaches a 45-degree angle. 2.keeping your neck in line with your spine and your gaze straight down, pull your elbows straight back and squeeze between your shoulder blades. 3.extend your arms back to the starting position. Complete 2 sets of 10. Dumbbell rear delt fly another move to strengthen your back, a dumbbell rear delt fly also focuses on the lats, as well as the rhomboids and the traps. Choose a light pair of dumbbells to complete this move and ensure that you’re pinching your shoulder blades together at the top to get the most out of it. 1.hold one dumbbell in each hand with your arms extended. Hinge at the hips until your upper body reaches a 45-degree angle and bring the dumbbells together. 2.keeping your spine and neck neutral, inhale and push the dumbbells out and up to the side until your arms are parallel to the floor. 3.exhale and return to the start in a slow and controlled motion. Complete 2 sets of 10. Exercise is a key component to treating pectusexcavatum. By strengthening your chest, back, and core muscles and stretching your chest cavity, you can combat the condition’s effects. Aim to complete these exercises several times a week to maximize results.
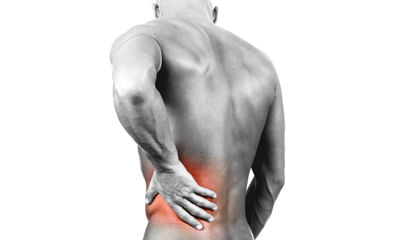
I've been getting pain in my right buttock, the bone in my buttock hurts and when the pain comes, I cannot walk rightly. ...
Ask Free Question
Kindly do these exercises. Plank the world record for the longest plank is 8 hours. Luckily, you don’t need to hold it that long for the exercise to have an effect! in fact. You can hold it for 10-15 seconds. • the plank is similar to a push-up position, but instead of resting on your hands, you rest on your elbows and bring them directly underneath your chest. • after kneeling, lean forward and place your elbows on the ground directly below your shoulders. • lift your knees off of the floor and push your feet back. Ensure your back is straight and keep your neck aligned with the rest of your spine. • hold the position and tighten your core muscles for the desired time. 2. Side plank just like the original plank, but only balancing on one side. • lie on the floor on your side, facing sideways with your feet together. • lift up your body until you are supporting yourself with your elbow, directly below your shoulder. • raise your hips until your body is in a straight line and tighten your core muscles; your body should create a slant from your shoulders to your feet. • hold this position without dropping your hips. • repeat on the opposite side. 3. Pelvic tilt with exercise ball sit on a ball that allows your legs to be at a 90-degree angle with your feet flat on the floor. • keep your shoulders back and spine straight. • tilt your hips forward and flex your abdominals tight. • tilt your hips backward as you stick your tailbone out. • move back and forth slowly, keeping your shoulders back. • repeat 10 times for 3 sets. 4. Superman lie on your stomach, face down, with your arms out in front of you. • lift arms, legs, and chest off the floor simultaneously while keeping your hips grounded. • hold for a minimum of two seconds. • lower back down slowly. • repeat 10 times for 3 sets. 6. Crunches lie flat on your back, placing your feet flat on the floor with your legs bent. • fold your arms across your chest and lift your torso up until your head, neck, and torso are off the ground. • hold for a moment before lowering back down. • repeat. 6. Quadruped arm opposite leg raises • kneel on the floor, lean forward, and place your hands palm-down on the floor. • make sure your back is straight, your knees are below your hips, and that your palms are directly below your shoulders. • raise one arm as you raise the opposite leg until both are aligned straight out from your body, parallel to your spine. • slowly lower both your arm and leg until you are back in the starting position. • switch arm and leg, and repeat. 7. Dead bug lie flat on the floor on your back. • lift your arms straight up from your body, reaching through the air. • raise one leg until it is at a 90-degree angle from your body. • slowly lower until it is in the starting position. • switch legs and repeat. 8. Hip bridge lie on your back with your knees bent and raised, your feet flat on the floor, and your arms at your sides. • keep your feet hip-distance apart and try to keep your leg in vertical alignment with your knee. • flex your glutes and push through your heels to raise your hips upward. Try to make a diagonal line from your shoulders to your knees. • hold for a short moment before lowering back down. • repeat 10 times for 3 sets.
My left side severe pain and upper back pain during 7 months but recently this pain hurts heavily I consult doctor ne to ...

Ask Free Question
Since when r you having this?What r other symptoms that you r experiencing? By doing what like walking, exertion, eating or empty stomach- it increases or decreases in intensity. For how much time it remains? Is there stiffness also? How is your appetite?R you constipated or having loose stools? Any problem in urine?I need details of the case. In the meanwhile follow this1. Take your breakfast every day. Don't skip it. U should eat whatever your mother or grandparent eat in bfast. I mean to say whatever is your traditional food. If punjabi eat paratha, if belongs to south then take idli/ dosa etc. 2. Don't overeat 3. Don't take tea empty stomach. Eat something like a banana (if you are not diabetic) or any seasonal fruit or soaked almonds and a glass of plain water first thing in the morning (preferably within 10 mins of waking up). No only biscuits or rusk will not do. 4. Have light meals every 2 hours (in addition to your breakfast, lunch n dinner) e.g. Nariyal paani, chaach, a handful of mixed dry fruits, a handful of peanuts, any fresh n seasonal fruit (eat whole fruit not juice), a cup of curd/milk etc 5. Take simple food like rice n dal in dinner. Finish your dinner at least 2 hours before going to sleep. 6. Maintain active life style7. Avoid fast foods, spicy n fried foods, carbonated beverages 8. Take a lot of green vegetables n fruit. 9. Drink lot of water.10. Everyday preferably sleep on same time 11. Take 1tsp of ghee in bfast, lunch n dinner. Exercise in the form of yoga, cycling, swimming, gym etc. Or do suryanamaskar daily homeopathy is a very effective for this problem n has very encouraging results. For details, consult online.

I fell on my knee 5 months ago. When I fell, it hurt a lot I almost fainted and it was swollen. It no longer hurts, but ...
Ask Free Question
Ice therapy would definitely help to reduce the inflammation. We also advise you to use knee cap which would help to prevent the knee from damaging further and also to maintain the quadriceps muscle tone. Stiffness have developed due to weakness of the ligaments &inflammed cartilage. Specific knee exercises will also help ie. Keeping ball underneath the knee and keep pressing it. That's the simple exercise which will help you to strengthen the knee. • ultrasound- which heals the damaged tissues and heals • electric stimulation / ift- which reduces the pain • kinesiology taping • application of heat or ice • soft tissue massages or knee joint mobilization 5 do’s & don’ts to reduce your knee pain. 1. Don’t take too much rest- not only your body muscles may become weaker even your joint’s pain may become worse. Take consultation from your physiotherapist to guide you with knee pain exercises which are safe for your knees & keep doing it. 2. Do exercise– exercises help in strengthening the muscles, increase flexibility & also support your knee. You can also do swimming, walking, elliptical machines & bicycles, etc. 3. Don’t avoid your weight– excess weight may increase the stress on your knee and if you have inflammatory arthritis then it may become worse. You don’t need to have ideal weight, you just need to start working to reduce the weight. 4. Rice -this process is good for joint pain caused due to minor injury or an arthritis. • • r (rest) – give some rest to your knees. • I (ice) – massage your knees with ice to reduce swelling. • c (compression)- start wearing compression bandage. • e (elevation)- keep your knee elevated. 5. Don’t wear bad shoes- we actively wear shoes in our daily life for hours without noticing how it can affect your knees badly. So, if you are facing knee pain, then check your shoes first. Is it giving you good comfort? If not then change it urgently. The importance of buying braces and splints from us – orthopaedic support braces we suggest you to wear knee brace which is available at our clinic. If you want you can buy from us, if you are far away from chennai we can send you by courier. The reason why we are conveying you to buy from us is we can demonstrate over the videocall (using whatsapp) and also we can monitor you throughout when to wear it and how long to wear it. And also if you find any difficulty wearing the brace you can also revert back to us for few more suggestions and we can propose you good solution how to go about it. Resisted terminal knee extension: make a loop with a piece of elastic tubing by tying a knot in both ends. Close the knot in a door at knee height. Step into the loop with your injured leg so the tubing is around the back of your knee. Lift the other foot off the ground and hold onto a chair for balance, if needed. Bend the knee with tubing about 45 degrees. Slowly straighten your leg, keeping your thigh muscle tight as you do this. Repeat 15 times. Do 2 sets of 15. If you need an easier way to do this, stand on both legs for better support while you do the exercise. Standing calf stretch: stand facing a wall with your hands on the wall at about eye level. Keep as arthritis is very common that you get generally bilaterally. Ice therapy would definitely help to reduce the inflammation. We also advise you to use knee cap which would help to prevent the knee from damaging further and also to maintain the quadriceps muscle tone 1. Heel and calf stretch to do this stretch: 1. Stand facing a wall. 2. Place your hands on the wall and move one foot back as far as you can comfortably. Toes on both feet should be facing forward, heels flat, with a slight bend in your knees. 3. Lean into the stretch and hold for 30 seconds. You should feel the stretch in your back leg. 4. Change legs and repeat. 5. Do this stretch twice for both legs. Short arc quad / isometeric quad exercise the short arc quad exercise is a great way to really focus in on properly contracting your quadriceps muscles. Here is how you do it: lie on your back and use a yoga block or basketball to prop your knee up. Slowly straighten your bent knee until it is all the way straight. Tighten your quad muscle with your toes pointed toward the ceiling and hold it tight for five seconds. Slowly lower your leg down. Repeat for 15 repetitions. Quadriceps, isometric (strength) this exercise is for an injured right knee. Switch sides if the injury is to your left knee. 1. Sit on the floor with your right leg straight in front of you. Bend your left knee up and put your left foot flat on the floor. 2. Flex your right foot and tighten the thigh muscles of your right leg. Press the back of your right knee toward the floor. Don’t arch your back or hunch your shoulders. 3. Hold for 5 to 10 seconds. Then relax. 4. Repeat 10 times, or as instructed. 5. Do this exercise 3 times a day, or as instructed. 2. Quadriceps stretch to do this stretch: 1. Stand next to a wall or use a chair for support. Your feet should be shoulder-width apart. 2. Bend one knee so your foot goes up toward your glutes. 3. Grab your ankle and gently pull it toward your glutes as far as you can comfortably. 4. Hold for 30 seconds. 5. Return to the starting position and change legs. 6. Repeat 2 times on each side. Hamstring stretch • take a break from strenuous activities to allow the injury to heal. • use a cane or crutches to avoiding putting your full weight on your injured leg. • apply ice packs several times a day to relieve pain and reduce swelling. • wrap the injured area with a compression bandage or wear compression shorts to minimize swelling. • rest with your leg elevated above the level of your heart, if possible, to improve drainage and minimize swelling. To do this stretch: to do this stretch: 1. For this stretch, you can use a mat to add cushioning under your back. 2. Lie down on the floor or mat and straighten both legs. Or, if it’s more comfortable, you can bend both knees with your feet flat on the floor. 3. Lift one leg off the floor. 4. Place your hands behind your thigh, but below the knee, and gently pull your knee toward your chest until you feel a slight stretch. This shouldn’t be painful. 5. Hold for 30 seconds. 6. Lower and change legs. 7. Repeat 2 times on each side. Strengthening exercises 5. Half squat to do this exercise: 1. Get into a standing squat position with your feet shoulder-width apart. Place your hands on your hips or out in front of you for balance. 2. Looking straight ahead, slowly squat down about 10 inches. This is the halfway point to a full squat. 3. Pause for a few seconds, then stand up by pushing through your heels. 4. Do 2 to 3 sets of 10 repetitions. 5. Calf raises to do this exercise: 1. Stand with your feet shoulder-width apart. Position yourself next to a wall or hold on to the back of a chair for support. 2. Lift both your heels off the ground so that you’re standing on the balls of your feet. 3. Slowly lower your heels to the starting position. Control is important with this exercise for strengthening your calf muscles. 4. Do 2 to 3 sets of 10 repetitions. 6. Hamstring curl 7. Leg extensions to do this exercise: 1. Sit up tall in a chair. 2. Put your feet flat on the floor, hip-width apart. 3. Look straight ahead, contract your thigh muscles, and extend one leg as high as possible without raising your buttocks off the chair. 4. Pause, then lower to the starting position. 5. Do 2 to 3 sets of 10 repetitions for each leg. 8. Straight leg raises to do this exercise: 1. For this exercise, you can use a mat to add cushioning under your back. 2. Lie down on the floor with one leg bent and one leg straight out in front of you. 3. Contract the quadricep of your straight leg and slowly raise it up off the floor until it’s the same height as your bent knee. 4. Pause at the top for 5 seconds, then lower to the starting position 5. Do 2 to 3 sets of 10 repetitions for each leg. 9. Side leg raises to do this exercise: 1. Lie on your side with your legs stacked on top of each other. Cradle your head in your hand, and place your other hand on the floor in front of you. 2. Raise your top leg as high as you comfortably can. You should feel this on the side of your hips. 3. Pause briefly at the top, then lower your leg. 4. Do 2 to 3 sets of 10 repetitions for each leg. 10. Prone leg raises to do this exercise: 1. For this exercise, you can use a mat to add cushioning beneath you. 2. Lie on your stomach with your legs straight out behind you. You can let your head rest on your arms. 3. Engage your glute and hamstring muscles in your left leg and lift your leg as high as you comfortably can without causing pain. Be sure to keep your pelvic bones on the floor throughout this exercise. 4. Hold your leg in the lifted position for 5 seconds. 5. Lower your leg, rest for 2 seconds, then repeat. 6. Do 2 to 3 sets of 10 repetitions for each leg.

I have 5 herniated disks (l1-l5), and one the is completely “blown out” of its sheath. I can only walk short distances, ...
Ask Free Question
Back pain can affect people of any age, for different reasonsas people get older, the chance of developing lower back pain increases, due to factors such as previous occupation and degenerative disk disease. Lower back pain may be linked to the bony lumbar spine, discs between the vertebrae, ligaments around the spine and discs, spinal cord and nerves, lower back muscles, abdominal and pelvic internal organs, and the skin around the lumbar area. •acute pain starts suddenly and lasts for up to 6 weeks. •chronic or long-term pain develops over a longer period, lasts for over 3 months, and causes ongoing problems. Home advise: •resting from strenuous activity can help, but moving around will ease stiffness, reduce pain, and prevent muscles from weakening. •applying heat, ice, ultrasound, and electrical stimulation — as well as some muscle-release techniques to the back muscles and soft tissues — may help alleviate pain. •as the pain improves, the physical therapist may introduce some flexibility and strength exercises for the back and abdominal muscles. Techniques for improving posture may also help. •the patient will be encouraged to practice the techniques regularly, even after the pain has gone, to prevent back pain recurrence. Regular exercise helps build strength and control body weight. Guided, low-impact aerobic activities can boost heart health without straining or jerking the back. Before starting any exercise program, talk to a health care professional. There are two main types of exercise that people can do to reduce the risk of back pain: •core-strengthening exercises work the abdominal and back muscles, helping to strengthen muscles that protect the back. •flexibility training aims at improving core flexibility, including the spine, hips, and upper legs. We suggest you to wear lumbosacral corset (belt) which is available at our clinic. If you want you can buy from us, if you are far away from chennai we can send you by courier. The reason why we are conveying you to buy from us is we can demonstrate over the videocall (using whatsapp) and also we can monitor you throughout when to wear it and how long to wear it. And also if you find any difficulty wearing the brace you can also revert back to us for few more suggestions and we can propose you good solution how to go about it. Uses of lumbosacral corset (belt) a lumbosacral corset adds pressure to the intra-abdominal area. This adds stability to the spine. It is prescribed to people suffering from moderate to severe pain. Other benefits of using a lumbar spine belt are: 1.helps in a certain degree of immobilization of facet joints. 2.reduces pain to allow continuation of normal activities. 3.speeds up the healing process. 4.the pressure exerted by a lumbar spine belt helps in stretching the erector spine muscles. 5.this belt can also be used to support the lower back while exercising. Helps prevent rolling provides stability to lumbar and sacral regions of the back can be used when performing actions like lifting and handling heavy items can also be used when playing sports restricts back movement to aid treatment of back problems do’s and don’ts sitting do: • sit as little as possible and then only for short periods. • place a supportive towel roll at the belt line of the back especially when sitting in a car. • when getting up from sitting, keep the normal curves in your back. Move to the front of the seat and stand up by straightening your legs. Avoid bending forward at the waist. • try to keep the normal curves in your back at all times. Don’t: • do not sit on a low soft couch with a deep seat. It will force you to sit with your hips lower than your knees and will round your back. You will loose the normal curve in your back. • do not place your legs straight out in front of you while sitting (e.g. Sitting in the bath tub). Standing do: • if you must stand for a long period of time, keep one leg up on a foot stool. • adapt work heights. Don’t: • avoid half bent positions. Lifting avoid lifting if you can. Do: • use the correct lifting technique. Keep your back straight when lifting. Never stoop or bend forward. Stand close to the load, have a firm footing and wide stance. Kneel on one knee, keeping the back straight. Have a secure grip on the load and lift by straightening your knees. Do a steady lift. Shift your feet to turn and do not twist your back. Don’t: • do not jerk when you lift. • do not bend over the object you are lifting. Lying do: • sleep on a good firm surface. • if your bed sags, use slats or plywood supports between the mattress and base to firm it. You also can place the mattress on the floor, a simple but temporary solution. • you may be more comfortable at night when you use a pillow for support. Don’t: • do not sleep on your stomach unless advised to do so by your doctor or physical therapist. Bending forward do: • keep the natural curves of your back when doing these and other activities: making a bed, vacuuming, sweeping or mopping the floor, weeding the garden or raking leaves. Coughing and sneezing do: • bend backwards to increase the curve of your back while you cough or sneeze. Driving a car do: • drive the car as little as possible. It is better to be a passenger than to drive yourself. • move the seat forward to the steering wheel. Your seat must be close enough to the wheel to keep the natural curves of your back. If your hips are lower than your knees in this position, raise yourself by sitting on a pillow. Exercises for low back pain 1. Bridges •lie on the ground and bend the knees, placing the feet flat on the floor hip-width apart. •press the feet into the floor, keeping the arms by the sides. •raise the buttocks off the ground until the body forms a straight line from the shoulders to the knees. •squeeze the buttocks with the shoulders remaining on the floor. •lower the buttocks to the ground and rest for a few seconds. •repeat 15 times and then rest for 1 minute. •do 3 sets of 15 repetitions. 2.lying lateral leg lifts •lie on one side with the legs together. •keep the lower leg slightly bent. •draw the bellybutton into the spine to engage the core muscles. •raise the top leg about 18 inches, keeping it straight and extended. •hold the position for 2 seconds. •repeat 10 times. •turn onto the other side of the body and repeat, lifting the other leg. •perform 3 sets on each side. 3.supermans •lie face down on the ground and stretch both arms out in front of the body, keeping the legs stretched out and flat on the ground. •raise both the hands and feet, aiming to create a gap of about 6 inches between them and the floor. •try to pull in the bellybutton, lifting it off the floor to engage the core muscles. •keep the head straight and look at the floor to avoid neck injury. •stretch the hands and feet outward as far as possible. •hold the position for 2 seconds. •return to the starting position. •repeat 10 times. 4.partial curls •lie back on the floor and bend the knees, keeping the feet flat and hip-width apart. •cross the hands over the chest. •breathe in deeply. •on the breath out, engage the abdominal muscles by pulling in the stomach. •gently raise the head and shoulders 2 inches off the ground while keeping the neck in line with the spine. •hold for 5 seconds then return to the starting position. •repeat the exercise 10 times. •perform 3 sets. 5.knee-to-chest stretches •lie on the back on the floor. •bend the knees, keeping both feet flat on the floor. •use both hands to pull one knee in toward the chest. •hold the knee against the chest for 5 seconds, keeping the abdominals tight and pressing the spine into the floor. •return to the starting position. •repeat with the opposite leg. •repeat with each leg 2–3 times twice a day. 6.lower back rotational stretches •lie back on the floor with bent knees and feet flat on the ground. •keeping the shoulders firmly on the floor, gently roll both bent knees over to one side. •hold the position for 5–10 seconds. •return to the starting position. •gently roll the bent knees over to the opposite side, hold, and then return to the starting position. •repeat 2–3 times on each side twice a day. 7.seated lower back rotational stretches •sit on a stool or chair without arms, keeping the feet flat on the floor. •twist at the core to the right, keeping the hips square and the spine tall. •position the hands behind the head or place the left hand on the right knee to support the stretch. •hold the position for 10 seconds. •repeat the exercise on the left-hand side. •repeat on each side 3–5 times twice a day. Posture when standing: make sure you have a neutral pelvic position. Stand upright, head facing forward, back straight, and balance your weight evenly on both feet. Keep your legs straight and your head in line with your spine. Posture when sitting: a good seat for working should have good back support, arm rests and a swivel base. When sitting, try to keep your knees and hips level and keep your feet flat on the floor, or use a footstool. You should ideally be able to sit upright with support in the small of your back. If you are using a keyboard, make sure your elbows are at right-angles and that your forearms are horizontal. Shoes: flat shoes place less of a strain on the back. Driving: it is important to have proper support for your back. Make sure the wing mirrors are properly positioned so you do not need to twist. The pedals should be squarely in front of your feet. If you are on a long journey, have plenty of breaks. Get angle. Out of the car and walk around. Bed: you should have a mattress that keeps your spine straight, while at the same time supporting the weight of your shoulders and buttocks. Use a pillow, but not one that forces your neck into a steep.
I feel pain im my hip bone in the back when I move after doing exercises like running or walking and the following day t ...
Ask Free Question
1.knee-to-chest stretch lie on your back with your knees bent and your feet flat on the floor (a). Using both hands, pull up one knee and press it to your chest (b). Tighten your abdominals and press your spine to the floor. Hold for 5 seconds. Return to the starting position (a) and repeat with the opposite leg (c). Return to the starting position and then repeat with both legs at the same time (d). Repeat each stretch two to three times â preferably once in the morning and once at night. 2. Lower back rotational stretch lie on your back with your knees bent and your feet flat on the floor (a). Keeping your shoulders firmly on the floor, roll your bent knees to one side (b). Hold for five to 10 seconds. Return to the starting position (c). Repeat on the opposite side (d). Repeat each stretch two to three times â preferably once in the morning and once at night. 3. Lower back flexibility exercise lie on your back with your knees bent and your feet flat on the floor (a). Tighten your abdominal muscles so your stomach pulls away from your waistband (b). Hold for five seconds and then relax. Flatten your back, pulling your bellybutton toward the floor (c). Hold for five seconds and then relax. Repeat. Start with five repetitions each day and gradually work up to 30. 4. Bridge exercise lie on your back with your knees bent and your feet flat on the floor (a). Keeping your shoulders and head relaxed on the floor, tighten your abdominal and gluteal muscles. Then raise your hips to form a straight line from your knees to your shoulders (b). Try to hold the position long enough to complete three deep breaths. Return to the starting position (c). Repeat. Start with five repetitions each day and gradually work up to 30. 5. Cat stretch position yourself on your hands and knees (a). Slowly arch your back, as if you're pulling your abdomen up toward the ceiling (b). Then slowly let your back and abdomen sag toward the floor (c). Return to the starting position (a). Repeat three to five times twice a day. 6. Seated lower back rotational stretch sit on an armless chair or a stool. Cross your right leg over your left leg. Bracing your left elbow against the outside of your right knee, twist and stretch to the side (a). Hold for 10 seconds. Repeat on the opposite side (b). Repeat this stretch three to five times on each side twice a day. 7. Shoulder blade squeeze sit on an armless chair or a stool (a). While maintaining good posture, pull your shoulder blades together (b). Hold for five seconds and then relax. Repeat three to five times twice a day. For this homeopathic treatment is very effective for more details you can consult me.
Due to continue weight gain and having poor posture while sitting, I have developed anterior pelvic tilt due to which my ...
Ask Free Question
Back pain can affect people of any age, for different reasonsas people get older, the chance of developing lower back pain increases, due to factors such as previous occupation and degenerative disk disease. Lower back pain may be linked to the bony lumbar spine, discs between the vertebrae, ligaments around the spine and discs, spinal cord and nerves, lower back muscles, abdominal and pelvic internal organs, and the skin around the lumbar area. •acute pain starts suddenly and lasts for up to 6 weeks. •chronic or long-term pain develops over a longer period, lasts for over 3 months, and causes ongoing problems. Home advise: •resting from strenuous activity can help, but moving around will ease stiffness, reduce pain, and prevent muscles from weakening. •applying heat, ice, ultrasound, and electrical stimulation — as well as some muscle-release techniques to the back muscles and soft tissues — may help alleviate pain. •as the pain improves, the physical therapist may introduce some flexibility and strength exercises for the back and abdominal muscles. Techniques for improving posture may also help. •the patient will be encouraged to practice the techniques regularly, even after the pain has gone, to prevent back pain recurrence. Regular exercise helps build strength and control body weight. Guided, low-impact aerobic activities can boost heart health without straining or jerking the back. Before starting any exercise program, talk to a health care professional. There are two main types of exercise that people can do to reduce the risk of back pain: •core-strengthening exercises work the abdominal and back muscles, helping to strengthen muscles that protect the back. •flexibility training aims at improving core flexibility, including the spine, hips, and upper legs. We suggest you to wear lumbosacral corset (belt) which is available at our clinic. If you want you can buy from us, if you are far away from chennai we can send you by courier. The reason why we are conveying you to buy from us is we can demonstrate over the videocall (using whatsapp) and also we can monitor you throughout when to wear it and how long to wear it. And also if you find any difficulty wearing the brace you can also revert back to us for few more suggestions and we can propose you good solution how to go about it. Uses of lumbosacral corset (belt) a lumbosacral corset adds pressure to the intra-abdominal area. This adds stability to the spine. It is prescribed to people suffering from moderate to severe pain. Other benefits of using a lumbar spine belt are: 1.helps in a certain degree of immobilization of facet joints. 2.reduces pain to allow continuation of normal activities. 3.speeds up the healing process. 4.the pressure exerted by a lumbar spine belt helps in stretching the erector spine muscles. 5.this belt can also be used to support the lower back while exercising. Ohelps prevent rolling oprovides stability to lumbar and sacral regions of the back ocan be used when performing actions like lifting and handling heavy items ocan also be used when playing sports orestricts back movement to aid treatment of back problems do’s and don’ts sitting do: • sit as little as possible and then only for short periods. • place a supportive towel roll at the belt line of the back especially when sitting in a car. • when getting up from sitting, keep the normal curves in your back. Move to the front of the seat and stand up by straightening your legs. Avoid bending forward at the waist. • try to keep the normal curves in your back at all times. Don’t: • do not sit on a low soft couch with a deep seat. It will force you to sit with your hips lower than your knees and will round your back. You will loose the normal curve in your back. • do not place your legs straight out in front of you while sitting (e.g. Sitting in the bath tub). Standingdo: • if you must stand for a long period of time, keep one leg up on a foot stool. • adapt work heights. Don’t: • avoid half bent positions. Lifting avoid lifting if you can. Do: • use the correct lifting technique. Keep your back straight when lifting. Never stoop or bend forward. Stand close to the load, have a firm footing and wide stance. Kneel on one knee, keeping the back straight. Have a secure grip on the load and lift by straightening your knees. Do a steady lift. Shift your feet to turn and do not twist your back. Don’t: • do not jerk when you lift. • do not bend over the object you are lifting. Lying do: • sleep on a good firm surface. • if your bed sags, use slats or plywood supports between the mattress and base to firm it. You also can place the mattress on the floor, a simple but temporary solution. • you may be more comfortable at night when you use a pillow for support. Don’t: • do not sleep on your stomach unless advised to do so by your doctor or physical therapist. Bending forward do: • keep the natural curves of your back when doing these and other activities: making a bed, vacuuming, sweeping or mopping the floor, weeding the garden or raking leaves. Coughing and sneezing do: • bend backwards to increase the curve of your back while you cough or sneeze. Driving a car do: • drive the car as little as possible. It is better to be a passenger than to drive yourself. • move the seat forward to the steering wheel. Your seat must be close enough to the wheel to keep the natural curves of your back. If your hips are lower than your knees in this position, raise yourself by sitting on a pillow. Exercises for low back pain safety guidelines • an increase in your low back pain can be expected with these exercises. This is acceptable as long as your leg symptoms are not increasing. • if while doing these exercises, your pain worsens or you have new pain or symptoms, stop the exercises and discuss your symptoms with your doctor or physical therapist. • stop exercising and let your doctor or physical therapist know right away if you have any change in your bowel or bladder control or any increase in weakness in your leg or foot. Exercises ‰ •press-ups: keep your back and buttocks relaxed and use your arms to press up. Concentrate on keeping your hips down and push up your upper body as high as possible. •double knee to chest: grasp both your knees with your hands and pull toward your shoulders. Hold the stretch for 1 second. Let your knees return, but keep them bent at arms length. ‰ •lumbar spine stretches: lie on your back. Bring your knees towards your chest. Rotate your knees towards the pain. •side-lying position: lie on your side and face forward. Have both arms straight in front and bend your knees. Turn your head as you move your top arm across your body as far as you can. Keep your arm in place and turn your head back to the starting position. Look back again and turn your head farther if you can. Bring your head and arm back to the starting position. Relax and repeat 10 times on each side. •hamstring stretch: lie on your back with your legs out straight. Raise your leg up and put your hands around the upper leg for support. Slowly straighten the raised knee until you feel a stretch in the back of the upper leg. Hold, then relax and repeat 10 times on each leg. •standing arch: stand with your feet apart and hands on the small of your back with fingers pointing backwards. Bend backwards at the waist, supporting the trunk with your hands. Keep your knees straight. Hold for 5 seconds. Repeat 3 to 5 times. Side glides: stand at a right angle to the wall about 2 feet o eliminate your pain improve your muscular endurance and strength attain better posture, balance, body awareness and co-ordination improve your balance and flexibility learn to lift properly. posture when standing: make sure you have a neutral pelvic position. Stand upright, head facing forward, back straight, and balance your weight evenly on both feet. Keep your legs straight and your head in line with your spine. Posture when sitting: a good seat for working should have good back support, arm rests and a swivel base. When sitting, try to keep your knees and hips level and keep your feet flat on the floor, or use a footstool. You should ideally be able to sit upright with support in the small of your back. If you are using a keyboard, make sure your elbows are at right-angles and that your forearms are horizontal. Shoes: flat shoes place less of a strain on the back. Driving: it is important to have proper support for your back. Make sure the wing mirrors are properly positioned so you do not need to twist. The pedals should be squarely in front of your feet. If you are on a long journey, have plenty of breaks. Get out of the car and walk around. Bed: you should have a mattress that keeps your spine straight, while at the same time supporting the weight of your shoulders and buttocks. Use a pillow, but not one that forces your neck into a steep angle.

After I was cracking my back a bone on my back started hurting when I move a certain way or cough, now if I cough it hur ...

Ask Free Question
Please never repeat this crack again. Go to your near by good physiotherapist or orthopedician for assessment of real cause. Use ice pack over painful area.

My mother has age 49-50 years she is suffering from lower back pain and shoulder pain since 4-5 years. Now she has also ...
Ask Free Question
It might be due to lower back pain which is quite common for adults who are of your mother's age. For shoulder pain you need to do basic shoulder exerices. It looks like you are anaemic. If you have back pain after you sit for long hours then it is due to your haemoglobin levels as it is important to check that. Anaemia always leads to the symptoms of being tired and also having back / leg pain though there may not be any pathological reasons for back pain. Back pain / sciatica: back pain can affect people of any age, for different reasonsas people get older, the chance of developing lower back pain increases, due to factors such as previous occupation and degenerative disk disease. Lower back pain may be linked to the bony lumbar spine, discs between the vertebrae, ligaments around the spine and discs, spinal cord and nerves, lower back muscles, abdominal and pelvic internal organs, and the skin around the lumbar area. •acute pain starts suddenly and lasts for up to 6 weeks. •chronic or long-term pain develops over a longer period, lasts for over 3 months, and causes ongoing problems. Home advise: •resting from strenuous activity can help, but moving around will ease stiffness, reduce pain, and prevent muscles from weakening. •applying heat, ice, ultrasound, and electrical stimulation — as well as some muscle-release techniques to the back muscles and soft tissues — may help alleviate pain. •as the pain improves, the physical therapist may introduce some flexibility and strength exercises for the back and abdominal muscles. Techniques for improving posture may also help. •the patient will be encouraged to practice the techniques regularly, even after the pain has gone, to prevent back pain recurrence. Regular exercise helps build strength and control body weight. Guided, low-impact aerobic activities can boost heart health without straining or jerking the back. Before starting any exercise program, talk to a health care professional. There are two main types of exercise that people can do to reduce the risk of back pain: •core-strengthening exercises work the abdominal and back muscles, helping to strengthen muscles that protect the back. •flexibility training aims at improving core flexibility, including the spine, hips, and upper legs. We suggest you to wear lumbosacral corset (belt) which is available at our clinic. If you want you can buy from us, if you are far away from chennai we can send you by courier. The reason why we are conveying you to buy from us is we can demonstrate over the videocall (using whatsapp) and also we can monitor you throughout when to wear it and how long to wear it. And also if you find any difficulty wearing the brace you can also revert back to us for few more suggestions and we can propose you good solution how to go about it. Uses of lumbosacral corset (belt) a lumbosacral corset adds pressure to the intra-abdominal area. This adds stability to the spine. It is prescribed to people suffering from moderate to severe pain. Other benefits of using a lumbar spine belt are: 1.helps in a certain degree of immobilization of facet joints. 2.reduces pain to allow continuation of normal activities. 3.speeds up the healing process. 4.the pressure exerted by a lumbar spine belt helps in stretching the erector spine muscles. 5.this belt can also be used to support the lower back while exercising. Ohelps prevent rolling oprovides stability to lumbar and sacral regions of the back ocan be used when performing actions like lifting and handling heavy items ocan also be used when playing sports orestricts back movement to aid treatment of back problems do’s and don’ts sitting do: • sit as little as possible and then only for short periods. • place a supportive towel roll at the belt line of the back especially when sitting in a car. • when getting up from sitting, keep the normal curves in your back. Move to the front of the seat and stand up by straightening your legs. Avoid bending forward at the waist. • try to keep the normal curves in your back at all times. Don’t: • do not sit on a low soft couch with a deep seat. It will force you to sit with your hips lower than your knees and will round your back. You will loose the normal curve in your back. • do not place your legs straight out in front of you while sitting (e.g. Sitting in the bath tub). Standing do: • if you must stand for a long period of time, keep one leg up on a foot stool. • adapt work heights. Don’t: • avoid half bent positions. Lifting avoid lifting if you can. Do: • use the correct lifting technique. Keep your back straight when lifting. Never stoop or bend forward. Stand close to the load, have a firm footing and wide stance. Kneel on one knee, keeping the back straight. Have a secure grip on the load and lift by straightening your knees. Do a steady lift. Shift your feet to turn and do not twist your back. Don’t: • do not jerk when you lift. • do not bend over the object you are lifting. Lying do: • sleep on a good firm surface. • if your bed sags, use slats or plywood supports between the mattress and base to firm it. You also can place the mattress on the floor, a simple but temporary solution. • you may be more comfortable at night when you use a pillow for support. Don’t: • do not sleep on your stomach unless advised to do so by your doctor or physical therapist. Bending forward do: • keep the natural curves of your back when doing these and other activities: making a bed, vacuuming, sweeping or mopping the floor, weeding the garden or raking leaves. Coughing and sneezing do: • bend backwards to increase the curve of your back while you cough or sneeze. Driving a car do: • drive the car as little as possible. It is better to be a passenger than to drive yourself. • move the seat forward to the steering wheel. Your seat must be close enough to the wheel to keep the natural curves of your back. If your hips are lower than your knees in this position, raise yourself by sitting on a pillow. Exercises for low back pain safety guidelines • an increase in your low back pain can be expected with these exercises. This is acceptable as long as your leg symptoms are not increasing. • if while doing these exercises, your pain worsens or you have new pain or symptoms, stop the exercises and discuss your symptoms with your doctor or physical therapist. • stop exercising and let your doctor or physical therapist know right away if you have any change in your bowel or bladder control or any increase in weakness in your leg or foot. Exercises ‰ •press-ups: keep your back and buttocks relaxed and use your arms to press up. Concentrate on keeping your hips down and push up your upper body as high as possible. •double knee to chest: grasp both your knees with your hands and pull toward your shoulders. Hold the stretch for 1 second. Let your knees return, but keep them bent at arms length. ‰ •lumbar spine stretches: lie on your back. Bring your knees towards your chest. Rotate your knees towards the pain. •side-lying position: lie on your side and face forward. Have both arms straight in front and bend your knees. Turn your head as you move your top arm across your body as far as you can. Keep your arm in place and turn your head back to the starting position. Look back again and turn your head farther if you can. Bring your head and arm back to the starting position. Relax and repeat 10 times on each side. •hamstring stretch: lie on your back with your legs out straight. Raise your leg up and put your hands around the upper leg for support. Slowly straighten the raised knee until you feel a stretch in the back of the upper leg. Hold, then relax and repeat 10 times on each leg. •standing arch: stand with your feet apart and hands on the small of your back with fingers pointing backwards. Bend backwards at the waist, supporting the trunk with your hands. Keep your knees straight. Hold for 5 seconds. Repeat 3 to 5 times. Side glides: stand at a right angle to the wall about 2 feet o eliminate your pain improve your muscular endurance and strength attain better posture, balance, body awareness and co-ordination improve your balance and flexibility learn to lift properly. posture when standing: make sure you have a neutral pelvic position. Stand upright, head facing forward, back straight, and balance your weight evenly on both feet. Keep your legs straight and your head in line with your spine. Posture when sitting: a good seat for working should have good back support, arm rests and a swivel base. When sitting, try to keep your knees and hips level and keep your feet flat on the floor, or use a footstool. You should ideally be able to sit upright with support in the small of your back. If you are using a keyboard, make sure your elbows are at right-angles and that your forearms are horizontal. Shoes: flat shoes place less of a strain on the back. Driving: it is important to have proper support for your back. Make sure the wing mirrors are properly positioned so you do not need to twist. The pedals should be squarely in front of your feet. If you are on a long journey, have plenty of breaks. Get out of the car and walk around. Bed: you should have a mattress that keeps your spine straight, while at the same time supporting the weight of your shoulders and buttocks. Use a pillow, but not one that forces your neck into a steep angle. You become aware of a frozen shoulder when it begins to hurt. The pain then causes you to limit your movement. Moving the shoulder less and less increases its stiffness. Before long, you find that you can’t move your shoulder as you once did. Reaching for an item on a high shelf becomes difficult, if not impossible. When it’s severe, you might not be able to do everyday tasks that involve shoulder movement such as dressing. Shoulder exercises and stretchesregular exercises and stretches can keep your shoulder strong and flexible. A few things to remember before swinging in to exercises: •stop any exercise if you have more shoulder pain. It may be too soon for you to try. •watch your form. Exercising incorrectly can also cause or worsen shoulder problems. •warm up, even before deep stretching. Light shoulder rolls, gentle movements, or even a warm shower are all ways to warm up your muscles before exercise and stretching. Pendulum stretch for range of motion•stand and bend at the waist. •let your arm on the injured side hang straight down. •keep your neck relaxed. •move your arm in a circle up to 20 times. •do once or more times in a day. Overhead shoulder stretch•sit or stand to do this shoulder stretch. •intertwine your fingers in front of you. •bend your elbows and raise your arms above your head. You can also place your hands on your head or behind it. •gently squeeze your shoulder blades together to move your elbows back. •continue for up to 20 repetitions. Repeat 5 to 10 times a day. Physical therapyphysical therapy is the most common treatment for a frozen shoulder. The goal is to stretch your shoulder joint and regain the lost motion. It can take anywhere from a few weeks to nine months to see progress. A home exercise program of gentle range of motion exercises is important. If you don't see progress after six months of intense, daily exercises, speak to your doctor about other options. Medicationsto treat the pain and reduce your joint inflammation, your doctor may recommend an anti- inflammatory medication like aspirin, ibuprofen, or naproxen sodium. A steroid injection you’re your shoulder joint may also help. Home careplacing an ice pack on your shoulder for 15 minutes at a time several times per day can help to decrease pain. If you’re working with a physical therapist, the exercises can be done at home. Your physical therapist will provide instructions on the types of exercises you must do, how often to do them, and when to push yourself harder. Most people with a frozen shoulder can improve their condition without surgery. You might become weak due to your uterus removal for which you have consume rich mineral and vitamin diet and also you should take rich calcium for your bone strength. And also hormonal imbalance should be noted and please consult your gyneecologist for the hormonal imbalance of both estrogen and progesterone.
